Written by: Scott Smith
KEY TAKEAWAYS IN THIS ISSUE OF TECHNICAL TOPICS:
- Safety is critical when working near silage
- Silage moisture, chop length, and weight applied must be right to achieve optimal packing density
- Each layer added to a silage pile during harvest must be thin enough for adequate packing
- Measuring density of existing silage piles provides insight for future opportunities
At this time of year, many dairy producers grow restless with a break from fieldwork in colder weather; months have been spent planning which crops to plant, where they are being planted when they will be harvested, and the logistics of getting them back home for storage. Imagine working tirelessly at the beck and call of mother nature to capture the correct maturity, dry matter, and digestibilities, only to have a crop (haylage/corn silage) enter a poor fermentation. Optimal cow performance relies on quality harvest and storage routines, as many dairies push to feed higher forage diets to reduce feed cost and improve profitability. The procedures used today greatly impact how that ensiled forage will feed out for months at a time. Understanding silage packing densities will help ensure that your hard work will result in quality feed for the milk cow ration. Calculating your bunker and pile densities may reveal strengths and weaknesses in your bunker management.
First and foremost, it must be stated that around any bunker silo structure, safety must be taken seriously and reviewed with the entire team. Approaching a silage face to measure densities comes with inherent risk and proper safety precautions are critical. Start with being safe and end with being safe from the time of ensiling until the bunker is empty. A review of bunker safety tips are listed at the end of this article*.
SILAGE MOISTURE, CHOP LENGTH, AND DENSITY IMPACT
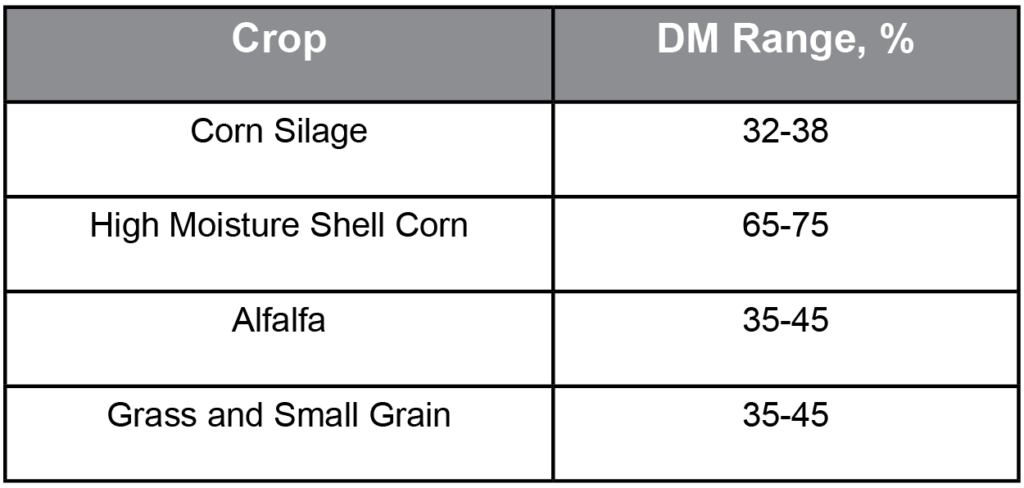
What is silage fermentation? Dr. M.E. McCullough (UGA) described fermentation as “The feedstuff resulting from the anaerobic preservation of moist forage or other feeds by the formation and/or addition of acids”. Proper fermentation requires the presence of sugars, acids, bacteria, and, crucially important, moisture. Dr. Larry Chase with the Department of Animal Science from Cornell University suggests the following targets for harvest dry matter (DM):
At the upper end of these ranges (more dry, less moisture), achieving optimal packing density becomes increasingly difficult. Conversely, if the feed is too wet, an undesirable fermentation will likely take place and important nutrients will be lost in leachate (runoff).
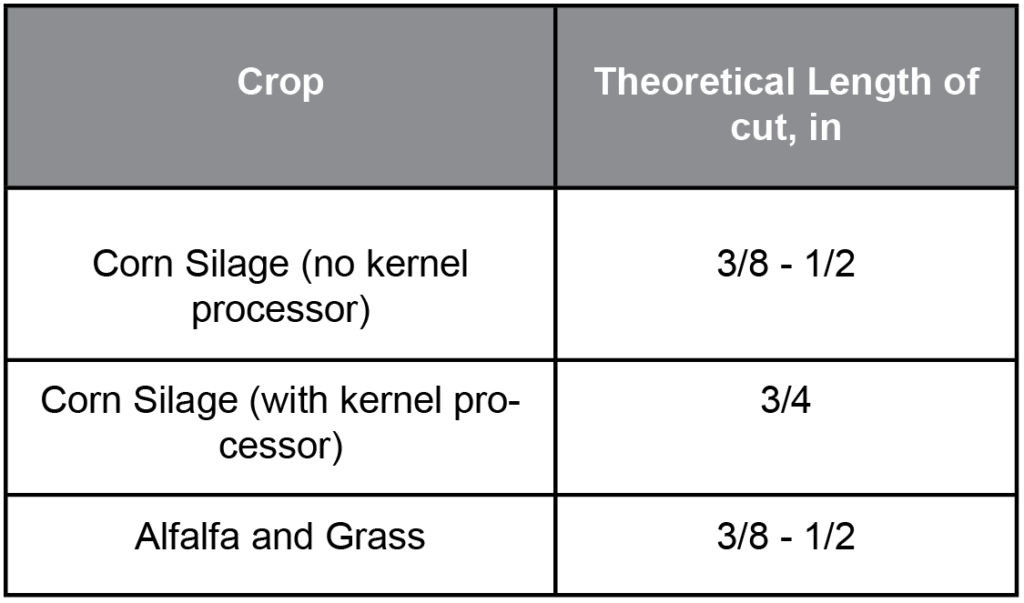
In addition to moisture, chop length will have an impact on the “packability” and resulting density of ensiled feeds, and therefore, fermentation quality. Furthermore, chop length will have an impact on the rate of passage and digestibility. Because of these factors, the ideal chop length often varies between farms, but rules of thumb for silages are:
Silage needs to be chopped fine enough for good packing to quickly eliminate oxygen to kick off a good fermentation process. At the same time, the chop length needs to be long enough to promote healthy rumen mat formation and cud chewing. Ideal chop length may vary based on the timing of harvest (plant maturity), variety of forage, and other available feed ingredients; it is prudent to work with your Standard Dairy Consultant and crop advisor to determine the optimal length of cut for your dairy.
GUIDELINES FOR ACHIEVING ADEQUATE PACKING DENSITY
Once that targeted DM and chop length have been captured, delivery and packing at the bunker is critical for removing as much oxygen as quickly as possible for the anaerobic bacteria to go to work. Pack, pack, and pack some more; tightly packed silage ferments more quickly and prohibits the growth of yeasts and molds that may produce harmful mycotoxins. Packing silage helps decrease the size of “pockets” and porosity where oxygen may penetrate. When an excess of oxygen is present, the effects on the ensiling process result in less than desirable outcomes such as slower fermentation, growth of yeast and molds, excess heating both in the bunker and at feed out, and nutrient DM loss. With oxygen adequately depleted (anaerobic), carbohydrates are quickly converted to organic acids, alcohol, and carbon dioxide. Next, as the pH continues to drop below 4.5, lactic acid-producing bacteria become inhibited. This is when fermentation becomes complete, and the ensiled forage becomes stable (a quality silage inoculant will promote the speed and effectiveness of this process). The temperature should stabilize close to the outside temperature at harvest.
For a bunker, the statement that “when you think you are done packing, you should pack that much more” is true. While filling the bunker, the recommended silage layer thickness is 6 inches at a time. The smaller the number of inches layered, the greater the packing and density may be achieved. This is one variable that can be controlled and highly influences silage density. Tractor weight is another variable producers can control and will highly influence silage density. Plan to increase tractor weight to increase silage density; a general rule of thumb is to apply at least 800 lbs of packing weight per ton of ensiled feed per hour. If 100 tons of silage are delivered to the bunker per hour, this would require 40 tons of tractor to adequately pack the material ((100 X 800) / 2000). This may be achieved by adding fluid to tires, adding weight directly to the tractor, or pulling a silage packing wheel.
MEASURING PACKING DENSITY
After the dust settles on the feed pad, measuring silage density is a beneficial practice that provides insights into the sufficiency of the packing process. Understanding the density achieved allows for fine-tuning of packing practices for future crop years as well as for more accurate calculation of forage inventory if feed was not “scaled in” during harvest. Silage density is often expressed as pounds of forage dry matter per cubic foot following the fermentation stage. There are a few ways to measure bunk density. One traditional approach is core sampling, which involves using a metal cylinder of a known volume to drill into the face of a silage pile. The “core” sample may then be removed from the tube, dried and, weighed. Based on the cylinder volume and weight collected, the value is converted to lbs DM per ft3. This process should be repeated across multiple areas of the face, and density will vary from top to bottom and side to side.
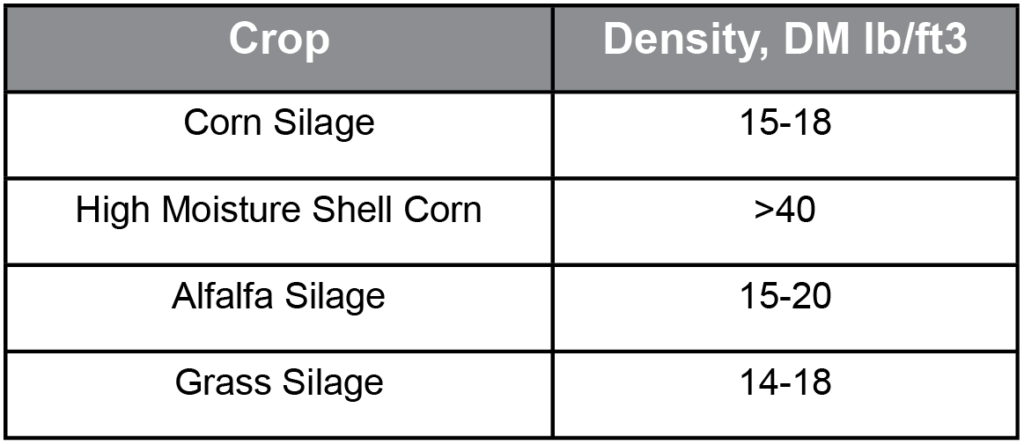
This approach comes with inherent risk, as the face of the silage pile must be approached and disturbed with the core sampler. For this reason, companies have developed safer methods such as a probe that may be connected to the bucket of a skid steer or end loader. The probe is driven into the face of the silage and pressure is measured. The pressure required to penetrate the face is correlated to the density, allowing for a calculation of density to be achieved. Finally, a simple method for estimating density may be achieved by monitoring the disappearance of the pile; using a tape measure or measuring wheel, the face’s surface area can be determined. Over the course of a week, volume removed from the face can be estimated by applying the length of the face having been removed to the surface area – a helpful practice may be to mark the base of the pile face with spray paint and measure the distance traveled after a week of feed out. Using feeding software, the actual weight of the feed used (as measured by the mixer wagon scale) may then be divided by the volume removed to calculate density. Some general targets for silage densities are listed below:
High quality forage is an essential ingredient in a dairy cow ration and can make or break the success of a feeding program. Providing ideal environmental factors, limiting variation, and carefully managing crop storage should be taken as a non-negotiable when considering the costly mistakes that can arise during the ensiling process. Taking the time to measure the density of an ensiled forage has the potential to highlight areas of success or concern and provides insights for future opportunities.
*BUNKER SAFETY REVIEW
- Stay in the tractor/truck while in or near a bunker or pile.
- Use radios to communicate.
- Develop a traffic plan and implement it.
- Use reverse alarm devices, including lights or beepers.
- All employees should always wear high-visibility safety vests.
- Never allow bystanders and people on foot (especially children) near moving harvest and transport equipment in the field or near packing and feeding equipment in a bunker silo or drive-over pile.
- Use caution when removing silage coverings and tether to a stationary object when on piled silage above six feet high.
- Never stand closer to the edge of the feed-out face than the face height of the pile.
- Use equipment operated from the ground to remove surface spoilage.
- Don’t ride in a front-end loader bucket.
- Maintain a vertical feed-out face.
- Don’t fill a bunker or build a pile higher than the unloading equipment can safely reach.
- Don’t put a plastic covering down between silage crops or cuttings and leave it there.
- Never work alone in a bunker or pile.
- Take forage samples from a loaded bucket after it has been moved to a safe distance from the feed-out face.
“People are the greatest resource on a farm. Accidents are never planned, but those few minutes can have long-lasting and traumatic impact.
Proactive steps can help reduce risk during silage harvest and feed-out.”
Julie Berry – Cornell CALS PRO-DAIRY
